


Taking a screenshot on your iPad is a quick and easy way to capture important information, share funny moments, or save a web page for later. Whether you have an iPad with a Home button or the latest edge-to-edge display, there are several methods to choose from. In this comprehensive guide, we’ll walk you through the different ways to take screenshots on your iPad and offer some tips for optimizing your captures.
Using Physical Buttons
The most common method for taking a screenshot on an iPad is by pressing a combination of physical buttons:
- For iPads with a Home button Like iPad 2021, iPad mini 6th gen: Simultaneously press the top button (power button) and the Home button.
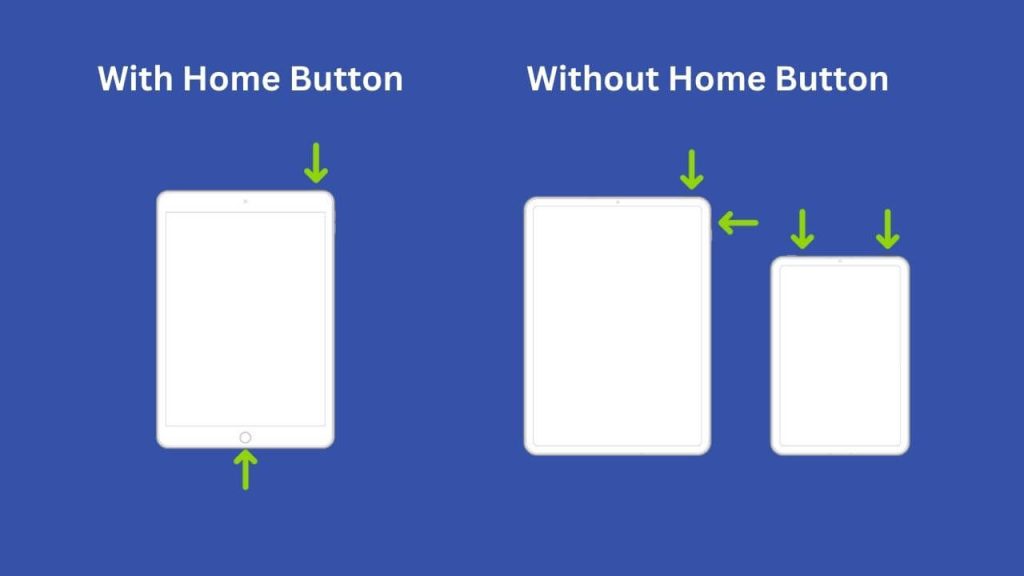
- For iPads without a Home button, such as the iPad Pro, iPad Air 2022, and iPad mini 2021, press the top button and either volume button simultaneously to take a screenshot.
- When done correctly, you’ll see a brief white flash on the screen, and you’ll hear a camera shutter sound (if your iPad isn’t in silent mode). A thumbnail of the screenshot will appear in the bottom-left corner, which you can tap to edit or share.
Using Apple Pencil Gestures
If you have an Apple Pencil, you can use a simple gesture to capture your screen:
- Swipe diagonally from the bottom corner of the screen toward the opposite corner.
- If the gesture doesn’t work, go to Settings > Apple Pencil and set the “Left Corner Swipe” or “Right Corner Swipe” to “Screenshot.
Using AssistiveTouch
If you have difficulty pressing the physical buttons simultaneously, Apple’s AssistiveTouch accessibility feature offers a buttonless alternative:
- Go to Settings Then Accessibility and then Touch click on AssistiveTouch and turn it on.
- Tap the AssistiveTouch button that appears on your screen.
- Navigate to Device > More > Screenshot.
Editing and Sharing Your Screenshots
After capturing a screenshot, you can edit and share it using the built-in tools:
- click on the thumbnail in the corner to edit the screenshot.
- Use the markup tools to add text, draw shapes, sign documents, or highlight specific areas.
- Tap the Share icon to send the screenshot via Messages, email, social media, or save it to your preferred cloud storage service.
Tips for Better Screenshots
- Customize the screenshot gesture in Settings > Apple Pencil to suit your preference.
- Use the “Full Page” tab in the screenshot editor to capture an entire webpage or document.
- Capture screenshots using the “Back Tap” feature, navigate to Settings, select Accessibility, then choose Touch. Configure your iPad to respond to either a double or triple tap on the back of the device.
With these methods and tips, you’ll be a screenshot pro in no time! Whether you’re capturing important information, sharing funny moments, or saving web pages for later, your iPad makes it easy to take and edit screenshots on the go.
Taking a screenshot on an iPad is a highly convenient feature that can be done in several ways depending on your iPad model and personal preference. Whether using physical buttons, AssistiveTouch, or the Apple Pencil, you can easily capture important information, images, or anything else on your screen. Once the screenshot is taken, you can quickly edit, annotate, and share it with others. Make sure to explore the different methods and find the one that best fits your needs for a smooth and efficient workflow.