


Windows 11 has introduced a revamped Start Menu designed to provide a more streamlined, modern, and customizable user experience. The new Start Menu offers a centered layout with enhanced personalization options and improved access to your apps and recommended files. If you want to try the new Start Menu on your Windows 11 PC, follow this detailed step-by-step guide.
Step 1: Ensure Your Windows 11 Is Up to Date
Before enabling the new Start Menu, make sure your Windows 11 installation is updated to the latest version that supports this feature.
- Go to Settings > Windows Update.
- Click on Check for updates.
- If updates are available, download and install them.
- Restart your PC if prompted.
The new Start Menu is available starting with specific Windows 11 builds released in 2025 or later, so updating is essential.
Step 2: Access Settings to Enable the New Start Menu
The new Start Menu can be turned on via the Windows Settings or via the Registry Editor for early access in some preview builds.
Method A: Via Settings (If Available)
- Open Settings (Press Windows + I).
- Navigate to Personalization > Start.
- Look for an option labeled New Start Menu or Enable New Start Menu.
- Toggle it On.
If you can’t find this option, your version of Windows 11 might not yet offer the feature through Settings.
Method B: Via Registry Editor (Advanced Users)
For users comfortable with advanced system settings, the new Start Menu can be enabled by editing the Windows Registry.
Note: Editing the Registry can cause system issues if done incorrectly. Always back up your Registry or create a system restore point before proceeding.
- Press Windows + R, type
regedit, and press Enter to open the Registry Editor. - Navigate to the key:text
HKEY_CURRENT_USER\Software\Microsoft\Windows\CurrentVersion\Explorer\Advanced - Right-click on the right pane and select New > DWORD (32-bit) Value.
- Name it
Start_ShowNewStartMenu. - Double-click the new DWORD and set its value to
1. - Close the Registry Editor.
- Restart your PC or restart Windows Explorer from Task Manager for the change to take effect.
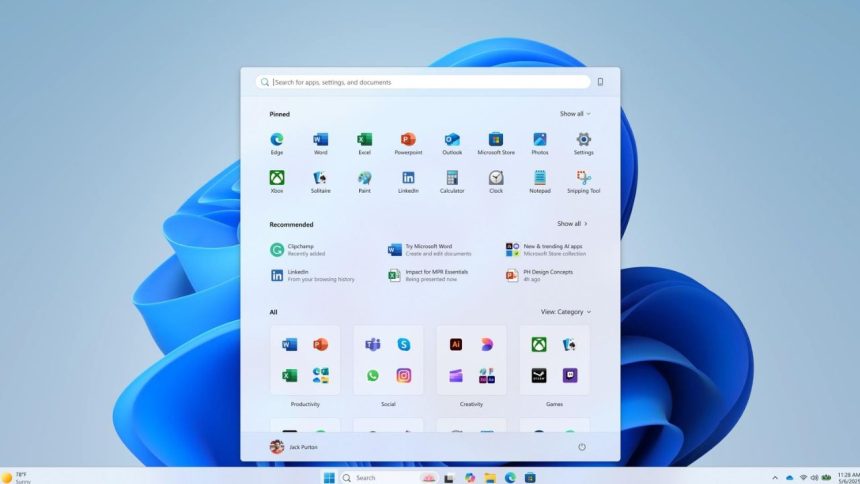
Step 3: Explore the New Start Menu Features
Once enabled, the new Start Menu offers:
- Centered layout: The Start button and menu appear centered on the taskbar.
- Updated pinned apps: A refreshed app grid with easy drag-and-drop support to customize your frequently used apps.
- Recommended section: Files, folders, and apps relevant to you based on your usage.
- Simplified Power menu: Easier access to shutdown, restart, and sleep options.
- Cleaner design: Rounded corners, streamlined icons, and subtle animations for a polished look.
Step 4: Customize Your New Start Menu
To personalize the Start Menu:
- Pin or unpin apps by right-clicking and selecting Pin to Start or Unpin from Start.
- Resize the Start Menu by dragging its edges.
- Rearrange pinned apps by dragging them to preferred positions.
- Access Settings through the Start Menu to adjust layout preferences.
Step 5: Revert to the Old Start Menu (Optional)
If you prefer the old Start Menu or encounter issues:
- Open the Registry Editor again.
- Navigate to the same key and set
Start_ShowNewStartMenuvalue to0or delete the DWORD. - Restart your PC.
The new Start Menu reflects Microsoft’s vision to simplify and beautify user interactions on Windows 11. It is optimized for both touch and mouse users, enhancing productivity and quick access. By following the above steps, you can experience the latest look and feel of Windows right now.